Story by Zoë Zulauf Ware /
Sure, you may have treated yourself to a few chocolate eggs that “fell” into your basket at the grocery store, but when was the last time you did something nice for your finger tendons? Despite the recent blanketing of snow, sooner or later you’ll be playing piano on small edges in Big Cottonwood Canyon and your paws better be ready. Give these tricks a whirl to boost your healing abilities before spring climbing season is in full swing.
Fingers: Tendon TLC
1. Contrast Bath Therapy
If you spend a fair amount of time climbing, you’ve likely experienced pain from a tweaked finger, if not a full-on pulley rupture or dreaded tendon injury. Contrast bath therapy utilizes a warm bath to relax and soothe with an ice bath to refresh and rejuvenate your digits. The temperature difference stimulates vasodilation and vasoconstriction in alternation, thereby bringing fresh blood and nutrients to aid in healing the area—plus, it feels heavenly on tired hands after a climbing session. You don’t have to go all Wim Hoff on the ice bath; just a generous handful of ice cubes in a bowl of cold tap water should do the trick. It should be cold, but not intolerably so. After all, if you can’t keep your paws submerged, what’s the point? Similarly, don’t scald yourself with boiling water. Keeping the temperature in hot-tub range (100-102˚F) ensures a therapeutic benefit, but won’t cook you like a lobster. With both bowls in front of you, set a timer for 15 minutes. Start by submerging your hand (or hands) for two minutes in the warm bath then one minute in the ice bath, repeating a total of five times.
Note: this practice is intended for old, familiar tendon aches and pains, not newly incurred ones. Avoid using heat therapy after a recent injury, and always defer to your physician and PT’s guidance! 2. Tough-Love Finger Massage If you’ve worked with a PT, they’ve likely recommended scraping therapy. If you’ve been to an acupuncturist, you may be familiar with gua sha. For the sake of softening any furrowed brows out there, I’ll call it a “tough-love” massage. Whatever you choose to call it, taking a few minutes after your climbing session to do it helps break down painful adhesions from overuse and bring fresh, oxygenated blood to the area. It sounds a bit scary at first, but it’s one of the most effective healing tools for finger injuries I’ve come across… Oh, and it feels fantastic, too.
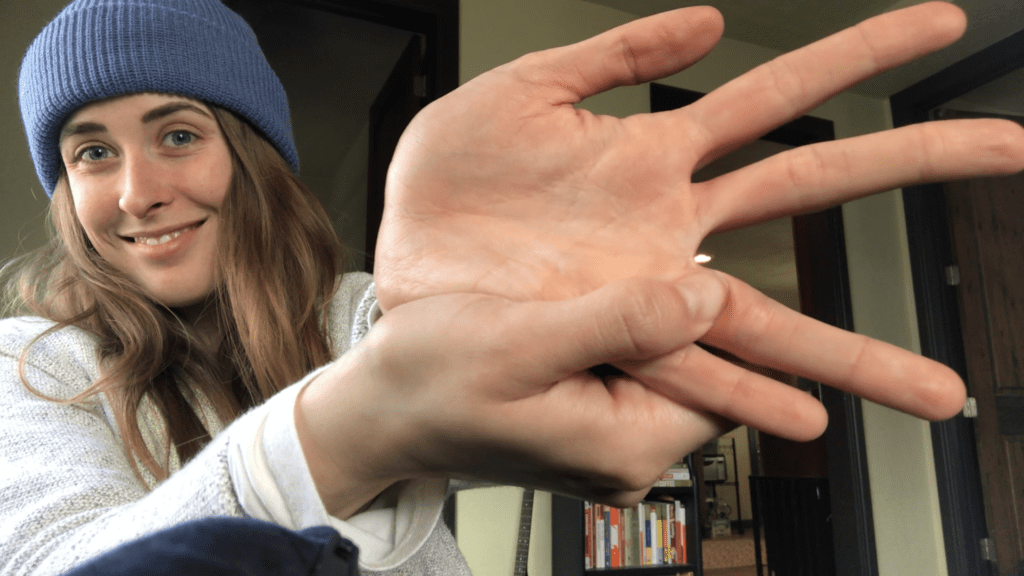
To start, apply a bit of your favorite climbing salve to clean hands to help preserve callouses and heal your skin. Massage from the base of your hands outward, then rub each finger lengthwise with the opposite thumb and index finger. The pressure applied to your fingers should be very firm, but not painful. Spend a little extra time on stiff, crunchy, or sinewy spots and go easy on your knuckles. For a more intense option, use the point of your thumb, the end of a spoon, or a gua sha/therapy tool like this to gently scrape back and forth along the your hands and fingers. Again, listen to your body for feedback; pressure and sensation are great, but pain and discomfort certainly aren’t. If you’re interested in learning more about the technique, this brief video provides a great example of using a scraping tool. Note: Scraping therapy and massage is fantastic for personal use, but if you use it on climber friends, they may fall desperately in love with you and want belay you on all your projects forever and ever. Don’t say I didn’t warn you. 3. Finger Yoga Finger yoga. Yup. It’s a thing. So get your digits with the program and say “Namaste away from the hand surgeon.” Working on your flexibility and range of motion increases circulation, reduces tweakiness, and warms you up for climbing sessions. First, I’ll introduce what I call “Finger Sun Salutations.” Start with your hand in a “forward fold” (as shown in the first photo) and slowly slide your fingertips up your palm until your fingers are completely extended (as shown in the fourth photo). Take a second to arch your fingertips back, then slowly curl your fingers back down. Try doing 10-15 Finger Sun Salutations twice a day.
Then, try a few rounds of Finger Splits. You can cut yourself some slack by using a softer surface like a couch cushion, or use a firmer surface for a less forgiving option. When your fingers are set up in the splits, use gentle downward pressure to stretch out your flexor and extensor tendons. Personally, I start by stretching my index finger forward with the rest back, then add fingers forward one by one. After that, I stretch my pinky finger forward with the rest back, then reverse the stretching order. Play around with different orientations of your fingers, leaving no combination unstretched. Ahhhhhh. Finger nirvana.
4. Hydrate or die, yo! I know, I know… I’m joining the proselytizing chorus of the “All Of Your Problems Are Because You Aren’t Drinking Enough Water” crowd, but hear me out. In addition to preserving fluid balance during sweaty workouts, fighting post-exercise fatigue, supporting kidney function, keeping joints and cartilage supple, aiding digestion, and giving you the power to move objects with your mind (okay fine, the last one isn’t true), proper hydration maintains the elasticity of your tendons, ligaments, and tissues. Consider how easy it is to snap an old, dry rubber band compared to a fresh, stretchy one—you don’t want to be the crusty rubber band.
Nutritionists and healthcare providers generally recommend drinking half your body weight in ounces per day, plus an extra 8oz for each cup of coffee, adult beverage, or hour of exercise you partake in. For example, a 140lb human should drink 70oz of water as a baseline, which is a touch over 2L. If that person had an americano and hit the gym for an hour-long climbing sesh, they’d want to add 16oz to their 70oz baseline, putting them at about 2.5L. If they spent five hours climbing desert towers in Castle Valley then celebrated with an amber ale at Moab Brewery, they’d add 48oz for a total of 118oz, or about 3.5L. Also, be mindful of replenishing your stores of electrolytes when you’re guzzling water or losing salt while sweating—it’s as easy as munching on a handful of sweet and salty snacks (think trail mix or pretzels and fruit) between sips or using an electrolyte mix like Gnarly Hydrate (made by a Utah local company!). 5. Strengthening & Antagonist Training Antagonizing doesn’t have to be agonizing. In fact, it can be pretty dang fun—especially when you have access to training tools like rice buckets! Here, Momentum climbers Esther Smith DPT and Brittany Griffith demo rice bucket exercises to strengthen your fingers, wrists, and forearms and prevent future injuries.
Of course, always check in with your doctor or PT when trying out new therapeutic movements and practices. Happy healing! Comment below to let us know what you’re excited about climbing this spring.